Recently I had to integrate a java based application with a web-service that used NTLM authentication. Since this was the first time I came across NTLM I initially had to explore how to deal with that auth-scheme.
Luckily, I finally stumbled upon the Authenticator-class in Java and learned that there is build in support for NTLM already.
How is NTLM supposed to work?
Well, as you’ve might guessed I’m not an expert here and if you’d like to learn more I encourage you to head over to this reverse engineering documentation of the NTLM protocol. For the sake of this post though, we just focus on the handshake which provides a pretty good overview of the steps involved:
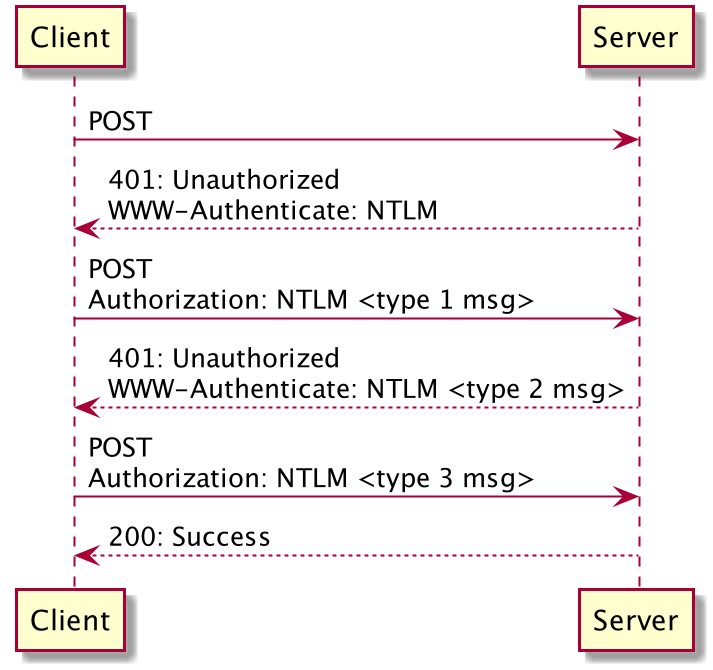
1.1 Client –[POST]–> Server:
In our use-case the java app issues a web-service call (thus a POST-call) to the destination. Right now this call doesn’t contain any authentication information at all.
1.2 Client <–[401]– Server:
The server answers with a 401 (== Unauthorized) return code and announces the NTLM auth-scheme by adding a WWW-Authenticate: NTLM-header to the response.
2.1 Client –[POST]–> Server:
The client re-sends its request but this time an Authorization-header is added as well. The header contains the NTLM auth-scheme and a so called type 1 message that indicates supported options.
2.2 Client <–[401]– Server:
Again the server responds with a 401 code but this time it also returns a challenge (basically a random number) contained in the WWW-Authenticate-header again.
3.1 Client –[POST]–> Server:
And again the client sends its original request but now the Authorization-header contains the encrypted challenge received in step 2.2. The key for this encryption is the users password-hash.
3.2 Client <–[200]– Server:
The server now does the equivalent (by asking the domain controller for the password hash) and compares the encryption results - finally, if everything matches, the requested resource is returned.
How to support that in Java
All this handshaking looks pretty elaborate - but the good news is that the NTLM authentication is already supported (the more challenging task was to figure out how to leverage that support).
Normally, you already know that you’ll have to authenticate yourself and for schemes like Basic Auth you usually add your authentication information directly to the request (also to prevent an additional round-trip). Hence no surprise, that you can spent a good portion of your career without knowing about the java.net.Authenticator class.
It was introduced in Java 1.2 (so it’s quite old) initially without NTLM support which was added later. Besides the API-documentation the usage of that class is also described in the Java SE documentation.
So, how this works is that you register a sub-class of java.net.Authenticator for your whole application using the static method Authenticator.setDefault(Authenticator). The only thing you’ll have to overwrite in that sub-class is the getPasswordAuthentication()-method which gets called by the networking-stack whenever a proxy or a server requests authentication (i.e. during a handshake as described above).
It’s up to your implementation how it retrieves the credentials - it could be interactive (i.e. when used in fat-client) or it can return pre-configured credentials (i.e. in a server environment).
One downside of that approach is that you can only register one instance - hence, if you’ll have to support a bunch of different servers or different authentication schemes you’d have to distribute that responsibility from within our Authenticator-implementation (just to prevent it from becoming a mess - technically of course you can put everything into one class).
So, in a JEE environment you could define a startup-singleton which globally registers a suitable Authenticator:
@Singleton
@Startup
public class AuthenticatorInitializer {
    @Inject
    @ConfigProperty(name = "ntlm.user")
    String username;

    @Inject
    @ConfigProperty(name = "ntlm.password")
    String password;

    @PostConstruct
    void initializeAuthenticator() {
        Authenticator.setDefault(new NtlmAuthenticator(username, password));
    }

    static class NtlmAuthenticator extends Authenticator {
        private PasswordAuthentication passwordAuthentication;

        NtlmAuthenticator(final String username, final String password) {
            this.passwordAuthentication = new PasswordAuthentication(username, password.toCharArray())
        }

        protected PasswordAuthentication getPasswordAuthentication() {
            return (this.getRequestingScheme().trim().equalsIgnoreCase("NTLM"))
                ? this.passwordAuthentication
                : null;
        }
    }
}
As you can see, within the getPasswordAuthentication()-method you’ll have access to further information about the requesting server. This allows you to distinguish between different servers, different auth-schemes etc. and thus enabling you to return matching credentials even when dealing with several service-provider.
That should do the trick and if you’d like to see what exactly is exchanged during a handshake I recommend you to have a look into my network debugging post as well.